0

How to Build a Nursing-Mom Wardrobe on a Budget

Nursing wardrobe on a budgetAfter giving birth and shedding 30 or so pounds I was really stoked to get back into my regular (non maternity) clothing again… except I forgot one thing – now that I’m nursing I can’t wear any of my tops and dresses that aren’t easy access to the all-you-can-drink milk buffet. (of course you can just lift your shirt up exposing your midriff… but I live in a cold climate so this wouldn’t work for me – especially with winter around the corner!)

I’m hoping to nurse for a year so this essentially means that I need a new wardrobe. I’m not willing to break the bank to do this for numerous reasons  1) I won’t be nursing forever – these clothes are short-term investments. 2) A lot of nursing clothing is really ugly! (You’re only one nursing-T away from graduating to “mom jeans”!) 3) I don’t have oodles of money to spend on new clothes.

Fashion wise, I’m a vintage girl with a second-hand budget. Many of my favourite frocks were procured from the local frippery, Salvation Army, or my grandma’s closet. I love clothing with classic 1940s lines and styling, or modern brand names with second-hand price tags!

When it came to maternity clothing, I scoured the local thrift shops for inexpensive but unique and stylish tops and empire-cut dresses that could get me through pregnancy without breaking the budget.

For nursing, there are a few items (like nursing bras) that you can’t get around purchasing – but when I saw boring and often ugly nursing tops going for 45$ + at my local maternity/ nursing store… I vowed to try the same thrift-store approach to finding breastfeeding clothing.

photo 1

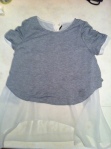
This top is still on the racks at the maternity store – selling for 39$. I got mine at the thrift store for 5$.

If your local second hand store has a maternity section head there first. Here you’ll often find nursing tops for a fraction of the price of the maternity store…and as people don’t nurse for very long, these tops are often in great shape and still in style. I scored two of the maternity store brand tops at my local thrift shop for 5$ each. One of the tops I got was so current it was actually still on the rack at the maternity store. I spent 10$ for two tops instead of 90$ (you can buy a lot of diapers for 90$!)

After scouring the maternity section of the thrift shop, I head to the regular tops section and look for shirts that can be converted into nursing clothing.


This v-neck shirt works fine for nursing

This v-neck shirt works fine for nursing

Any type of deep v-neck, button down, or wrap top could work for breastfeeding. I also got a couple shawl-style cardigans that I could use to throw over my shoulders for privacy when feeding in public. These tops set me back 5-7$ each.

photo 4

Another maternity store shirt bought for 5$


Shirt inside-out: bib has holes cut into sides for nursing

Shirt inside-out: bib has holes cut into sides for nursing

The construction of most nursing tops from the maternity store consists of a v-neck top with a bib or cowl-neck panel that has either hidden holes or slits cut into it for easy breast access. Once I understood how nursing tops worked, I realized I could easily make my own.

Take an old tank-top, cut wider arm holes into it and then wear this under any button down, v-neck or wide neck shirt and PRESTO you have several new nursing shirts.

elegant cowl neck shirt

elegant cowl neck shirt – 5$ thrift store find

photo 2

cut two hidden slits to make it nursing-frinendly

I also found a cowl-neck top at the thrift ship that I could cut hidden access slits into.


A third option is to buy a long/loose blouse in a sheer or light material, cut an access slit in the middle of the chest and cover this with a loose crop-style t-shirt.

photo 2

Ebay find for 15$

photo 3

Sheer under shirt has access panel cut in centre.


photo 4

The tank inside of this deep v-neck shirt has wide enough arm holes to use for nursing.

I did buy a couple new and inexpensive items for my nursing wardrobe: A black and a white nursing camisole/tank top with clip-down sides that I could wear with my existing blazers or cardigans. I also found a really funky top from Hong Kong (on ebay) that cost me 15$ shipping included. I get compliments on it all the time and like it so much I’ll wear it when I’m not nursing too. My biggest splurges were a 30$ nursing shirt on the liquidation rack at the maternity store, and a Calvin Klein deep V shirt that needed no alteration to work as a nursing top that I got at an outlet centre for 20$.

In all I built a nursing wardrobe of over 13 different tops, sweaters and camisoles that can be combined to make 30+ looks for under 130$ (or the price of 4 shirts from the maternity store)

With a keen eye, some patience, and some scissors, you too can build a stylish and inexpensive nursing mother wardrobe.

0

Organizing the Chaos: Create a Baby binder.

When it comes to work, my files, projects, and papers are ordered and systemized with military precision…but I have to admit I’m not the most organized person on the homefront.

Besides, has anyone ever looked back at life and regretted not keeping a neater home (Hells no!) My philosophy is not to let life pass you by while you’re vacuuming (this is why I bought a Roomba). As a general rule I clean enough to keep a healthy and presentable home…but choose to live life rather than clean it. (Plus anytime I invite my mother over, she takes it upon herself to scrub, clean or dust anything she feels is sub-par – which is basically everything!) This used to drive me absolutely crazy. But when “Dr. Strangely-loves-to-clean” comes for a visit I’ve learnt to stop worrying and love the Mom.

Before Sweet Pea was born I knew things at home were going to get a little crazy so I decided to bring some of my work-life organization skills home. This included making a Baby Binder – a great way to keep all the baby’s papers, medial documents, schedules, recipes, keepsakes and thank-you card lists organized and close at hand.

In those sleep-deprived first weeks when you’ve got tons of hospital, doctor and government paperwork to deal with, gifts to keep track of, appointments to make and feedings to log, this binder comes in really handy!

What you’ll need:

A binder

Tab dividers (I used large ones for the major categories and smaller tabs to divide items within a category – see below) Here’s a great site for free tab and label printables

Sheet protectors (good for holding official docs, brochures or other items you want to keep in the binder)

Plastic ring binder envelopes or zip pockets (good for holding blank thank-you cards, vaccine books, keepsakes etc…)

Table of Contents:

Here is the table of contents I came up with for my binder – (I admit, a lot of this was overkill – but it will come in handy eventually) You can expand or contract this list to fit your own family’s needs. You can also take each section and make it into a series of smaller baby binders. To make things easy, I’ve included links to where I found free printables that you can use…I’ll also add free downloads of some of the sheets I created custom graphics for – feel free to use them for your own binders.

Contact Info: 
This section includes a series of lists such as: Emergency Contact Info (info-sante, poison control etc.), Family Contact Info and Babysitter Contact Information. Here are some free and stylish contact lists that you can fill out and print.

Baby Care Logs: 
This section includes things such as: A Baby Care tracker (We took this to the hospital with us and used religiously the first couple of weeks to track our baby’s eating, diapering and sleeping until Sweet Pea regained his birth weight.) You can also include items such as a Pumping Log and Solid Food Log for once you start introducing foods and need to take note of any allergies or adverse reactions to foods.

Medical Info: 
In this section I put things like my insurance information, Baby’s vaccine book, medicare card, Doctor’s visit log, Immunization/medical records, a growth tracker, tooth chart and medication log. (I take this section out of the binder and with me to all medical appointments)

You can find various medical log printables in these places:

http://www.printablebabyplanner.com/preview/Medication_Log

http://www.freeprintablemedicalforms.com/category/children

http://alphamom.com/parenting/baby/keeping-track-of-baby-teeth/

Caregiver Info: 
This section won’t likely be needed until later – but it is a place for eventual babysitters or the daycare. In this section I added babysitter notes for us to put any info the sitter would need, While you were out notes for the caregiver to report anything back to us, baby favourites list where we can list songs, toys, food or activities Sweet Pea likes to make things easier for caregivers, a morning routine list and bedtime routine list.

Recipes: This section is pretty self-explanatory. I keep my crock pot freezer recipes here, baby food recipes for once Sweet Pea begins solids, and organic Baby Product Recipes here.

Baby travel: 
Here you can keep things like baby’s passport handy and well as packing checklists for the suitcase or diaper bag so you don’t forget anything vital when leaving home

Milestones and Keepsakes:
Here I placed a baby’s firsts log sheet to note when the little one hits certain milestones (sleeps through the nighs, turns over, takes first steps etc…) I also included a zip pocket for various keepsakes (hospital bracelets, first lock of hair, ultrasound pics etc…)

Important Docs:
Here you could put things like government docs (Social insurance card, Birth Certificate), Maternity leave documentation, or daycare wait list info.

Miscellaneous section:
This was kind of a catch-all for anything that didn’t warrant its own section. I put a baby gift log here so I could keep track of who gave what and who I needed to send thank-you cards to. Manuals and warranties for the baby car seat, stroller etc., a website password log for all the baby-related sites I signed up for, a lullaby cheat sheet, baby coupons etc…

Another great idea is to put pens, scissors, tape, markers, glue, etc. in a zip pocket at the front of the binder so these things are always close at hand. I also have a monthly calendar placed at the beginning of my binder so I can see any upcoming baby appointments or events at a glance.

Anyway, there is also lots of online inspiration for creating your own baby binder. You can purchase adorable graphic templates on places like Etsy. Pintrest is also a great ways to source free binder printables. And tons of helpful blogs that offer free downloads of family binder sheets or talk about how they organize their baby binders.

If you’ve got a couple moments before the craziness begins, a baby binder will help you stay organized amidst the chaos.

2

DIY organic baby products – if you can make Kraft Dinner, you can make this!

photo 3Admittedly I am a first time mother and, like all new parents, my husband and I are probably a bit over protective of Sweet Pea.

If we do have another baby I’m sure we’ll allow our second child to lick the floor, sleep with our cats, and spend all day in a dirty diaper…but for the moment, at least, we’re your stereotypical over-protective, over-eager & over-tired parents.

With all the “how to be paranoid while expecting” type books and articles on the web, can you really blame us!

Before Sweet Pea was born, I did a lot of online research into making your own organic baby products. We had read all sorts of articles about the dangers of chemicals in baby wipes, diaper rash cream and detergents, plus we had also spoken to many of our friends whose little ones got severe diaper rashes from the perfumes and synthetic substances in the various store-bought baby products placed upon their skin.

(Cue the eye-rolling here…) Yes I know that we all grew up and survived just fine when our moms used these products on us, but they also used to prescribe Lysol for douching – just because something was done in the past doesn’t necessarily mean it is the best choice now. I am also not claiming to be an organic zealot – yes my baby will someday come into contact with store-bought shampoo, regular baby wipes, and your everyday diaper rash cream… but if I can find an easy way to make healthier products for my child why not!

My desire to make my own organic baby products was two fold.

1) I was concerned about the chemicals we’d be exposing our baby to

2) I’m rather cheap and can’t necessarily afford trendy organic products at the health food store

After finding some simple online baby product recipes, making a few tweaks of my own, sourcing economical places to purchase the supplies and containers, I whipped up a batch of Diaper Rash Cream, Foaming Baby Wash/Shampoo, and Baby oil.

Coop Coco is where I soured most of my ingredients – they sell organic soap making materials in bulk and ship all over Canada. Plus they have a storefront if you’re local. Many of their prices were cheaper than my local health food stores. I love this place!

I got the coconut oil from the grocery store (I found it was cheaper there than any health food place) and most of my bottle & glass jars are from the dollar store. So are the labels I put on the jars – but these are really not needed.

The ingredients and supplies cost me around 60$ – but I’ve got enough diaper cream to last 5 months and enough supplies for baby wash and oil for at least a year – so I think it was money well spent.

A Month in, I’m happy to report that even while sleep deprived, I’ve easily whipped up my second batch of Baby Wash, the Diaper Rash Cream is working, and my little one loves the calming Baby Oil I apply after his bath.

So here are the recipes and methods I used.

photo 1DIAPER RASH CREAM

  • 1 cup shea butter
  • ½ cup coconut oil
  • 1 tbsp beeswax pellets (if you can’t get pellets just melt a natural beeswax candle)
  • 3 tbsp Zinc Oxide (Some people have issues using this ingredient, but I did a lot of research and felt that it’s moisture repelling properties were needed) – you can omit this if you’d like – especially if you are using cloth diapers.
  • 15 drops Lavender essential oil (optional) (I also used this to make padsicles – so it’s worth investing in a bottle)

Directions:

1) Clean & dry your cream containers. (I used dollar store glass jars, but you could use mini jam mason jars, or Tupperware containers – anything with a well-sealing lid. Keep in mind that the cream sets thick – like a pomade, so you need to place it in a wide mouthed container as opposed to a squeeze one. The recipe filled 5 of my small jars.)

photo 22) Melt Shea butter, coconut oil, and beeswax in bowl placed above a pot of hot water (double boiler). It should only take a couple minutes for everything to melt together.


photo 33) Add the zinc oxide to the bowl and mix with a hand blender/mixer for several minutes until the powder is completely incorporated with no clumps.

4) Add 15 drops lavender essential oil and mix to incorporate.

photo 45) Pour mixture into containers and allow to set.

*** Zinc oxide is water repellent so as soon as you’re done pouring your mixture into jars, you’ll want to wipe down your bowl/mixer with paper towels and wash right away.

photo 2FOAMING BABY WASH / SHAMPOO

I used this simple online recipe you could also  add 3-5 drops of Lavender and/or Orange essential oils to the wash.

The recipe calls for distilled water to prolong the shelf life of the Baby Wash. In the first couple of weeks I used this soap for diaper changes so I went through quite a bit of it. My next batch I’ll probably just used regular water and eliminate the distilling step.

This was a useful link for distilling my own water.

photo 1BABY OIL

  • 6 oz Coconut Oil
  • 10 drops Lavender essential oil

Directions:

1) Clean and dry your containers. (I used dollar store travel shampoo bottles.)

2) If needed melt your coconut oil – then pour into container.

3) Add lavender drops and shake bottle to incorporate.

**Depending on the coconut oil you use, the oil sometimes solidifies. I just soak the bottle in a bowl of hot water while I’m bathing my little one – so the oil is ready to go for the after-bath massage.

I haven’t yet ventured to make my own wipes (I bought a boat load of these rather pricey organic ones)…but there are a ton of online resources for making these too so maybe I’ll give it a try.

4

Padsicles – the only item you place in the postpartum ward fridge that other people won’t eat!

Padsicles

Everyone warned me about the morning sickness that comes before a baby and the sleep deprivation that comes afterwards but people tend to gloss over the actual nitty-gritty details about giving birth – things that a lady should really be told.

So to be blunt…

1) It hurts like hell and no amount of hypnobirth app training will dull this pain. (No I could not visualize my body opening up like a lotus flower – it felt more like being ripped apart on a medieval breaking wheel! – anyone who tells you otherwise is either lying or actually had an epidural that worked)

2) You do not exactly forget the labour pain when they place your little miracle on your chest…in fact you are reminded of it every time you sit, go to the bathroom, sneeze or cough.

3) There will likely be some damage down there that will require stitches and it will take a couple of weeks for this to heal.

Welcome to motherhood!

One thing I am glad I discovered on the internet before I delivered was something called padsicles! – not as delicious as popsicles…but almost as satisfying.

“What are padsicles?” you might ask… they are maxi pads treated with various healing ingredients and then frozen. When the time comes (and it will!) you pop one out of the freezer and use it as you would a regular maxi – only this frozen one helps to bring down swelling, disinfect and heal your lady parts so that you can maybe one day not want to strangle your husband or partner when 5 minutes after you give birth they announce how the baby can’t grow up an only child and absolutely needs a little brother or sister.

There are all sorts of DIY padsicle recipes and instruction videos you can google online so I won’t add to the clutter. I’ll just say that I was so thankful to come across these two great blogs, their padsicle recipes, and step-by-step instructions.

http://www.modernalternativemama.com/

http://intheknowmom.net/

I ended up using this recipe because it described the healing properties of each of the 4 essential oils used. (Calming swelling, cellular regeneration, scar prevention, disinfectant, muscle strengthening etc.) Plus my best friend works for a natural health company so I can purchase the essential oils at a major discount.

But if you don’t feel like forking over tons of money for essential oils you’ll only be using a couple of drops of, this simpler recipe requiring only lavender essential oil is just as good.

Plus the lavender essential oil can also be used to make several natural creams, soaps & oils for the little one (as it is safe for newborns)

Any health food store should have all the ingredients needed to make the pads – just be sure to get 100% witch hazel as opposed to the one at the pharmacy that is mixed with alcohol.

If you’ve got the time to whip up a batch of padsicles prior to delivering, I highly recommend it!

They would also make a pretty awesome DIY baby shower gift!